Mini Action Research

3D Student Samples

3D Student Samples

Mini Action Research Reflection

This experience has challenged every morsel of knowledge from electronic engineering to computer programming experiences to pull this lesson off. The lesson was not what I thought it would be, but turned to be much more. The students got a lesson in internet highway, bandwidth, binary code and how computers should transfer data from machine, airways and back again; from program to program. They did get to experience the down side of technology but remained interested despite the pitfalls of our deli-ma.  They enjoyed the activities and were very enthused at the program and the 3D view of themselves. After two weeks of trial and error to get things working I had to resolve that some problems can not be fixed and you must do what you can to teach with what you have. So with 3 working computers and one sometimes working computer, two 3D printers, a phone camera, a Nikon camera and an underwater/shock resistant video/still camera, we set out on our journey,

At least one student in each class was able to finish a product and print each day the printer was in class. The plan was to talk everyone, at one time, through the tools and program together. The revision ended in walking students through the one student who could gain access, while everyone watched and listened. Instead of in-class assignments, I had to assign at home assignments because of the lack of computers per student versus time.

If I had to do it over again. I would double-check the requirements of every computer expected to use, the internet services accesses, rights and privileges for downloading etc. BEFORE starting the project. One thing that I come to realize is that some schools – just because they say they offer technology, they want technology doesn’t mean they are ready for technology. This experience was great practice for troubleshooting and accessing my knowledge pool from electronic engineering to computer programming. I did come to realize that this is probably the condition that a lot of schools are in and that they do not get the full learning experience that technology today can offer; due to cost, technology inexperience administration or like in my case, new to the school (first year they had any computers or computer classes offered to students – unfortunately Mavis Beacon before me and Mavis Beacon after me) or other hurdle that hinders technology integration.

I like the concept, the ideas, STEAM – trans disciplinary aspects, visual reasoning and all the lessons that it can be taught and learning that can stem off of the concepts, ideas and experiences they offer; what I struggled with the most was the technology. Not the use of, the knowledge of finding a solution, but it was the lack of bandwidth, updated computers with no dual co-processors, little memory and no administrator rights slowed things down.

Would I teach this again? Under ideal circumstances, ABSOLUTELY!! Under unfavorable/outdated conditions – I would have to consider on a case by case basis.

2 Comments

Filed under EDTC 5340

EDTC 5340 WEEK 13

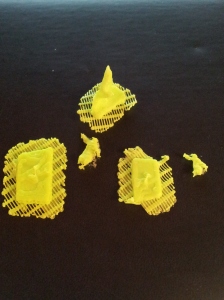
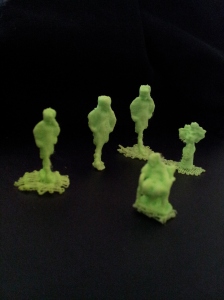
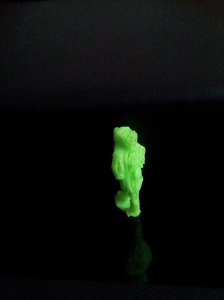
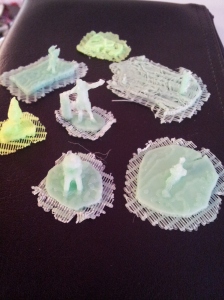
These are the ones we did get to print. As you can see they did not turn out quite like they hoped. A learning experience. The base of one was too large for the figure, so the figure turned out as a small green scribble, that fell off the stand. The object was grown larger to see if that had any effect; it did not. The other was morphed, so it looked like a headless figure.
PIC STUD PROD1

Current progress on the mini-action research project: Found out that there is not enough bandwidth to run more than two computers at a time; on-line. With an internet based program – Bummer! I am on plan M. I may have a solution to my problem, by uploading the file to the hard drive and working off-line on the downloaded version. It only accesses the on-line account if I need to edit a picture or convert to fabricate.
What did I accomplish this week? I learned that the students are eager to learn, but finding out the down side to technology. I want them to be interested in technology and not turned off by it.
What do I need to accomplish next week? A Solution, fabricated copies and happy students. Grade papers from a written assignment.
How have you been utilizing your own transdisciplinary abilities and visual-reasoning abilities this week? Teaching the students to think about things backwards when they are using the tools. (like carving a pumpkin) look at the black and white spaces. Student are recognizing the Math, art and science aspect of the project. Some are getting to know the engineering aspect too.
The students recognized that it made a difference if their capture files were missing angles. The learned about matrix. Technology pitfalls and successes. They all loved watching the printer print.
Three things I learned
One I must really enjoy what I do, because after all said and done I should be frustrated by all rights. I am not however, and have realized it just makes me more excited about technology.
two I am a persistent person that refuses to give up.
three that just because you have internet and a class you call technology, does not mean it IS ready for technology.
What new questions or ideas do I have?
Can I finish this project in time for the holidays.

Leave a comment

Filed under EDTC 5340

EDTC 5340 Week 11

Legobotics
Sample Robots Projects

Transdisciplinary abilities – math, engineering, technology, and science is obvious to me. Art was a little harder to recognize, but I could count my expressions through the choice of voice I gave my robot, perhaps through movement as well.
Visual- reasoning – ability to put back together what we have pulled apart. Definitely difficult for me. When I studied how to build a computer, one thing that is taught is to always draw a picture of where everything goes BEFORE you take it apart. Label everything. Given the time restraints and dynamics of our group this did not happen. Being in a group – those who were better at the visual reasoning – put the robot back together as the rest of offered support and suggestions. (I was not good at the visual reasoning, without the drawing).

STEAM connections – I like the way the robot activity that seemed to be guided by getting us to engineer something (dissecting and reconstruction of the robot) together using technology to program the device to help conduct a science experiment and adding the element of vocal expression (Art). Very Clever. I wish we could have programmed the robot to do more. But it matched the lesson, that we did. (I have to say I was disappointed and was really looking forward to making the robot do some really neat things) But had fun anyway!

The robot dissecting and resembling could be used for upper grade levels and not so much the younger grades unless modified. However the robot programming could be any grade level. Programming made easy.

How could you integrate robotics and digital fabrication activities together into a meaningful lesson that amplifies or transforms learning?
Some ideas came to me as I read this question
* Creating an obstacle course from 3D designing and printing. Programming the robot to move around and pick up items.
*Create other parts that can be used to snap-on the robot or replace broken pieces.
* Recreate the robots plastic motor housing using 3D fabrication.

Three things I learned
-That I still am not good at visual reasoning
-I learned that I must have a backup plan because of the internet and technology set backs
-I learned that there is a knowledge gap between 8th graders and 6th graders in technology at the school I am doing my action research project.

Two things I want to learn
How to make a project template accessible to all my students so they can just import, change some things and print
How to change my action research project to not include internet heavily

One thing I still have a question about
How to clean out the 3D printer before putting up

1 Comment

Filed under EDTC 5340

EDTC 5340 WEEK 10

Character Prototypes
These are the samples I made for my class to see. The far left 3 are prototypes of one subject – Polar Bear Girl. a 1 inch figure takes about 11 minutes to print. A 1 in a half inch figure takes about 17 minutes to print. The sit down figure 3/4 inch figure took 9 minutes to print.
The following is what I thought of the transdisciplinary and visual reasoning in their projects
Laura’s Pyramid – transdisciplinary abilities (TA) include Math and Science apparent in the building and construction of the structure/ Eng. and Art lends itself to design.
Adam’s Boat – TA included Math, Science, Eng. in the design and structure process. Until Adam explained the boat concept I struggled with visual reasoning.
Lori’s Puzzle – Visual reasoning is found when she had to think of how to use math to create the puzzle so it fits together. Art, Eng. and technology was used in designing the object.

All the 3D projects presented during Monday’s class seemed to be geared for upper grade levels (4-12). The project lesson plans seemed feasible for the particular grade level it was designed for. The time constraints could be a factor. Each student has a different level of technology knowledge and skill. Some will pick it up easier than others, those that don’t will need more coaching and time.
After helping with the Saturday workshop on making 3D Rings – It was confirmed that the smaller and less skilled lost interest quick while others may have been frustrated with technology they dreaded on in their creations. It was good to see the turnout and the many creations no matter the shortfalls or epic hurdles. I think everyone had fun. It might want to be considered that the less skilled and the younger audiences have a template that is altered a small bit or just copied and printed out. After all they have to start somewhere and isn’t it still learning if you have little skill just going through easier steps to feel accomplished than to accomplish some steps to just give up and never accomplish?
Just a thought!
What new questions or ideas do you have?
Three Things I learned
1. 3D fabrication can be used to teach almost any subject
2. 3D fabrication is a good tool for integrating technology into any subject
3. I found this site and think we talked about it earlier on our class but thought the video interesting.
3D Printing using sound and light to create a 3D object. This 3D printer prints with resin and saltwater.Two things I want to learn
1. How to edit holes in the Catch program without filling in the whole thing.
2. If it is possible to import different Autodesk program creations into other programs. (Catch into Design and visa versa)
One thing I still have a question with is How can we use this program to include lower grades.

1 Comment

Filed under EDTC 5340

EDTC 5340 WEEK 9

My Blog just feels naked without a week 9

3D Game Piece Prototype

3D Game Piece Prototype


Back view - Prototype

Back view – Prototype

I like Autodesk123D Capture better than the 123D Design to bring Art into the project. I also think that 123D Design takes more time to learn. I wanted to make the learning experience fun for the kids as they learn, and also give them a chance to “own a part of their learning” by letting them choice the pose in which they get to work with.

I did have epic fails – Prototype number one was about 1/3 of an inch and set at minimize materials. The result was a tiny string of plastic just moving around on the glass plate.
Prototype 2 was a dot of plastic that did not stick to the glue (glue perhaps was not tacky enough.
Prototype 3 is the one in the above picture. Learning from this prototype – minimize material is not the way to go. The object must be printed upright (minimize lays it down), so at least what little features it has at this size can be seen. Minimizing the materials put a plastic nodule on the face of this prototype. It also caused the figure to have stringy particles in part of the figure that is not melted. (Cool for a prototype to demonstrate how the printer prints though). The figure needs to be set at thicken and ignore the option to minimize. Also during the trimming of the photo capture I trimmed to much of the base so the base does not have a stable stand alone base.
Hoping to be able to print a working – less flawed figure to show to the students.

3 things I learned.
1. Minimize is good to save materials but sacrifices quality on smaller objects.
2. To much glue is a bad thing and waste time
3. Printing can not be rushed

2 things I want to learn
1. What the correct formula for printing such a small object is
2. How to throw a dart to hit the bulls eye at the carnival to win the BIG prize!

1 thing I still have a question about
How many students can finish their project on time?????

Leave a comment

Filed under EDTC 5340

EDTC WEEK 8

Sharing Monday night epic fail. No product failure yet, but did have technology failures but the internet was either being selective and I was not on the list or I tasted a bit of 21st Century Digital Reflux. But finally I created my key chain, but did not get to print yet.
I did enjoy sharing the CATCH program and my discoveries.
I got to visit the site for which I will conduct my Action Research Project (for a dry run), That was an epic fail. Plan F. I find myself evaluating my ideas and feasibility of lesson plans. Computer internet was spotty at best. Autodesk being an online program or requires you have an on-line access for conversions, this could turn into a problem. I am going to have faith and try it anyway. Hey a learning experience is a learning experience.
(OCT 19 – entry) I tried the first phase of the Autodesk123D Catch Mini Action Research Project yesterday with the 7 & 8th graders. The eight graders followed instructions very well and most o them took to heart the task and completed it. The seventh graders, half did what was required and the other half either did not understand or didn’t really care for the task?? Those students will need to re-due phase one.
I had to divide the students into groups because of the limited devices and computers. My surprise the only technology fail was that the school added a mandatory password for outside computers, that was not present at the beginning of the week, and no one had the password on campus. It did not matter so much, it turned out that the computers decided to work and six instead of three was very helpful.
I can not wait until phase two. However the school does not meet for the next 2 weeks on Fridays (all computer classes are on Friday), so I will have to wait.

The hardest thing is to picture what intervals that need to be captured in order to create a successful replica of the intended image. This program helps students understand the visual aspect or views of a subject. Students get to visualize what it may look like before taking the pictures, allowing for conformation or results from their efforts when downloaded pictures reveal their results. Great for critically thinking. A lot of science is present.
I think any grade or skill leveled student could be taught the picture taking, uploads and saving aspects of the program. The tools are not hard to learn just hard to get use to.

STEAM connection,
Experimented with Light, reflective materials, shadow, movement all tested this week in several capture sessions of various subjects to see what guide lines I need to set for my mini lectures on taking photos.
Math – tested through the use of angles and ratios.
Science/Engineering/Technology – Problem solving. Needed 4 photo capture devices, tested out the cell phone, digital camera, video/still digital camera to see if they could be used. Success! Found alternative solutions. Also may use android tablet.
Art – creating a master piece with digital fabric, How awesome is that?
Three things I learned
1. Catch online
2. Catch download
3. Three D printing is cool to watch, even if technology goes fishing for a while
Two things I want to know
1. How to import or export my capture from online to downloaded program and visa versa
2. How to print from the Catch program download
No Picture this week. I did not print anything and already shared my capture photo last weeks bog and in class.

1 Comment

Filed under EDTC 5340

EDTC WEEK 7

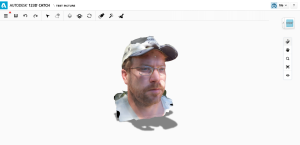
Decided to check out the Autodesk 123D Catch program. You take a series of pictures of an object (my test was a person) then you upload and the program converts it to a 3D Object. So How cool is that?

Autodesk123D Catch

Autodesk123D Catch

I used a digital camera and took about 9 pictures (7 -32 program suggested)
What I discovered. The more pictures and angles of the picture you take the better replica you get.
The more pictures you take also increases the upload and conversion times. Backgrounds have an effect on the picture interpretation conversions.

Ideas for lessons that came to me as I tried this experiment.
Technology
Of course there is Technology of the program itself, but more powerful is I can use any device that takes pictures (phones, tablets, computers, digital camera, DS etc.) and design the lesson so it is an incorporation of different types of devices interfacing. (i.e. Bluetooth from phone to tablet, tablet to computer USB port, SD card to computer or camera hookup directly to CPU)
Art
Digital Sculpturing – an awesome lesson on using digital tools to capture objects and converting into a digital 3D image, ready for manipulation and molding. (students take still life photos with the digital devices, upload to the program and manipulate the matrix to produce desired effects)
Science
Experimenting with different types of colors, textures that will have an effect on the picture during the capture process, to determine if there is an effect / change in the way the image is interpreted by the (i.e. using different colors – black/white and textures – mirrors/patterns)
Math
Learn about matrix, everything can be broken down in triangles
Measurements are also present
Engineering
Problem solving the process
Transdiciplinary
ADD Language Arts, History, Government, Business and the above subjects and the following:
If you were a ruler in the era/time (period of history studying – Rome, Reinsurance, America )
and you requisitioned a sculpture artist to sculpt you – what would be your pose and why? What would be your name? How would you rule? Who would be your enemies and foes during the time of your reign, why?
Visual reasoning
One has to think of the matrix in which the program is converting the object and trying to makes reference points to connect to a close resemblance of the original object. If you miss any angle than the matrix has a gap, or holes. Some can be repaired others can not (Seen in the picture of my test subject above, I did not take pictures of the top of the head, and the sun reflecting from the brim of the cap interfered with capturing/conversion results, leaving a un-fixable gap). Understanding the 3 dimensional frame-work as opposed to the 2 dimensions we are used to, helps to capture the objects in entirety, minimizing gaps and holes in the matrix fabric.

I studied both on-line and downloaded software Autodesk 123D Design as well as Autodesk 123D Catch. I compared the program to see which may fit my needs and to understand how the tools worked. I saw potential in both programs. I found the on-line programs limited and the downloaded programs to have more editing capabilities. All four programs were different and took some time to learn. The questions I kept asking were “can my students do this in a limited time frame and can I teach this on only 4 computers? I still have those questions. It is not a question if the student will get the tools, I think they will, it is a question if the internet connection can handle it.
Three things I learned
1. I found that I like the Catch program over the Design, it was easier to understand and fit into a technology class (is what I was ask to do by the Dean of the school).
2. I did not have an epic fail, but I did have a learning experience. I learned that light and photo angles affect the process.
3. Also if you do not take enough pictures the program will have gaps and holes in the final product.
Two things that I want to learn
1. How the 3D printer works
2. How long a project takes to print.
One question I still have
1. Can I print on the 3D printer with the Catch program and how big will it print?

1 Comment

Filed under EDTC 5340

EDTC WEEK 6

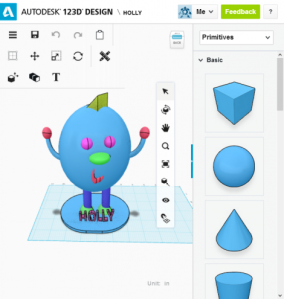
Created by Holly Shinn

Created by Holly Shinn

What is the educational value of using the 3D modeling software by itself?
I have spent the past week trying to figure out the tools in the Autodesk 123D program. The educational value screamed at me! Math! – Math student, I am not; Math teacher, I will never be accused of being; so this might explain the struggle I had. I saw potential for the less technical students and for the more advanced. Talk about visual-reasoning overload. Takes a while to get use to the different views. Once the tools made since, then the math made since. I think that if the teacher becomes knowledgeable about any subject or tool they could modify for all grade levels.

How does allowing students to engage in the process all the way through printing the design change learning? EXCITEMENT!!! Giving the student a voice in what they are learning is always a good thing. Engaging the student and letting them have a say in what they are learning can only help in the process of transfer of knowledge. As the teacher takes the role of coach or guide in order to help the students explore their own ideas and processes. Helping them reach their goal and full potential; this is beneficial in psychological ways also.

If there was no printer in the classroom, would learning still be effected by simply sending the design to be printed by a 3rd party (i.e. Shapeways or Thingiverse)?
Yes! Learning still happens, but different lessons are taught. Not everything in life is always the same, teaching one process (making in class) is easy to see instant results, (which is what our “digital society” has grown accustom too). Another advantage is the ability to make instant revisions. However having the printer is nice, most classrooms situations in public schools will be dealing with lack of a 3D printer (due to cost and reasonable practicality), but he lesson is still taught but it becomes a lesson titled Out Sourcing, how some businesses do business.

How did this week’s activities affect your awareness and/or perceptions of transdisciplinary abilities and visual-reasoning abilities?
This weeks activity being the lesson plan, created an awareness of understanding and how to recognize visual-reasoning and transdisciplinary within TEKS, ISTE NETS, and OTHER STANDARDS.

What STEAM connections did you experience this week (both within this week’s activities and your daily life)?
MATH – especially angels. When trying to learn the Autodesk tools, shapes, sizes, ratios, perimeters, and angles all play a part in the design process. Creating art by using technology and math, who would have thought engineering would be so much fun?

3-2-1: What new questions or ideas do you have?
3. Things learned
I learned that viewing one angle of an object is not good enough, you have to full from all angles
The hardest concept to grasp was the combining of two or more objects – work still in progress
Save often!!

2 Things I still want to learn about
More about the inserting of one object into another in Autodesk
To try out the Autodesk 123D program were you take a picture and create an object from that

1 question I still have (actually have 2)
Do we get to use the 3D printer in our “Take Action Research” project?
How much is a spool of plastic for the machine?

Leave a comment

Filed under EDTC 5340

5E Lesson Plan

Reflection on lesson plan
I knew what I wanted to do, say and test for but found it hard to follow the layout of 5E at first. Once I got the hang of it and worked on it in sections, it started to make more sense. I found that STEAM was tied together in trandislpinary more than I anticipated for my lesson. This was great to discover.
I created my artifact with settle flaws in mind, (okay it was a mistake at first but turned out to be a learning tool to be used in my lesson plan. So I made the second one flawed also.
https://docs.google.com/document/d/1_UxlOelVOO6dqWxezNuwl7IeWQx6P3Qtpdn6AH-yDow/edit?usp=sharing
link to a picture of 5E sample boxes

Leave a comment

Filed under EDTC 5340

EDTC 5340 Week 5

◾How did this week’s activities affect your awareness and/or perceptions of transdisciplinary abilities and visual-reasoning abilities?
Transdisciplinary – Art and Math – angels, lines and proportions, science and engineering – problem solving
AS far as visual reasoning – I must really be bad at it because it I taking me awhile to wrap my brain around the way things should be manipulated and folded. Still learning in progress.

◾What STEAM connections did you experience this week (both within this week’s activities and your daily life)? Pop ups can help identify STEAM, art is a given creativity, triangles and proportions for math, technology – program, science and engineering = problem solving.

◾How could you differentiate these types of activities for different grades and ability levels? I think the kids can get this easier than me. I think that once you help assist with the visual reasoning that is required for pop-up construction.

◾What other types of objects could be designed using the concept of pop-ups (optional share links to inspirational ideas)?
Architecture structures, springs, machine parts.

◾Were you fortunate enough to experience an “epic fail” when attempting to fabricate your design in class on Monday? If so, share the experience and discuss at least one thing you learned from it. No epic fail from the Christmas tree.

https://docs.google.com/document/d/1mis0lF3ndVXsUXQwtLp2u9dWtEUMEe5poMKkOCqnwwA/edit?usp=sharing
link to Christmas pop-up and Lesson Plan sample pictures

3 things I learned
I am not very good at pop-up folding and visualizing
I still need practice at understanding pop ups
I like this class it is a lot like playing

2 things I still need to understand
pop mechanics
pop up design mechanics

one question I still have
what we are going to learn )play with next week)
b.3-2-1: What new questions or ideas do you have?

Leave a comment

Filed under EDTC 5340